2022-2-18-优质网站推荐
分享几个有用的网站,收录自互联网,侵删
音乐
https://music.qier222.com/
网易曲库,ui很漂亮
Ai人工智能
https://ai.baidu.com/
有许多可以试用,可以用百度账号登录,api大多有免费次数
无版权图片
https://pixabay.com/
图片数量极大
https://www.pexels.com/zh-cn/
人气很大,图片数量也不小
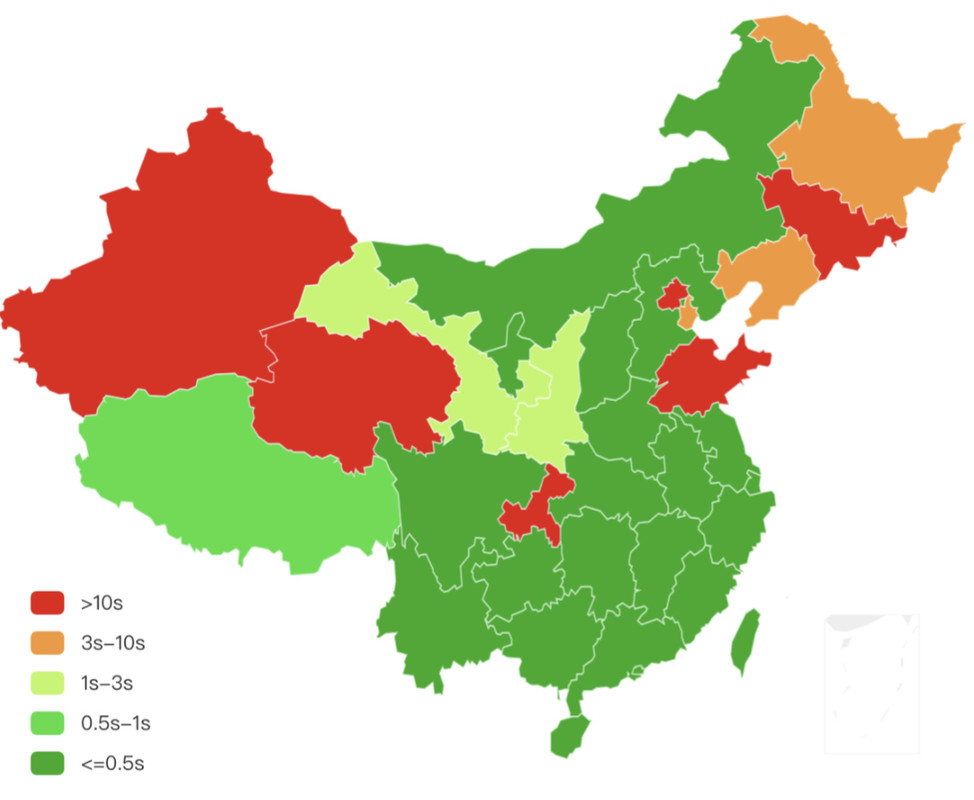
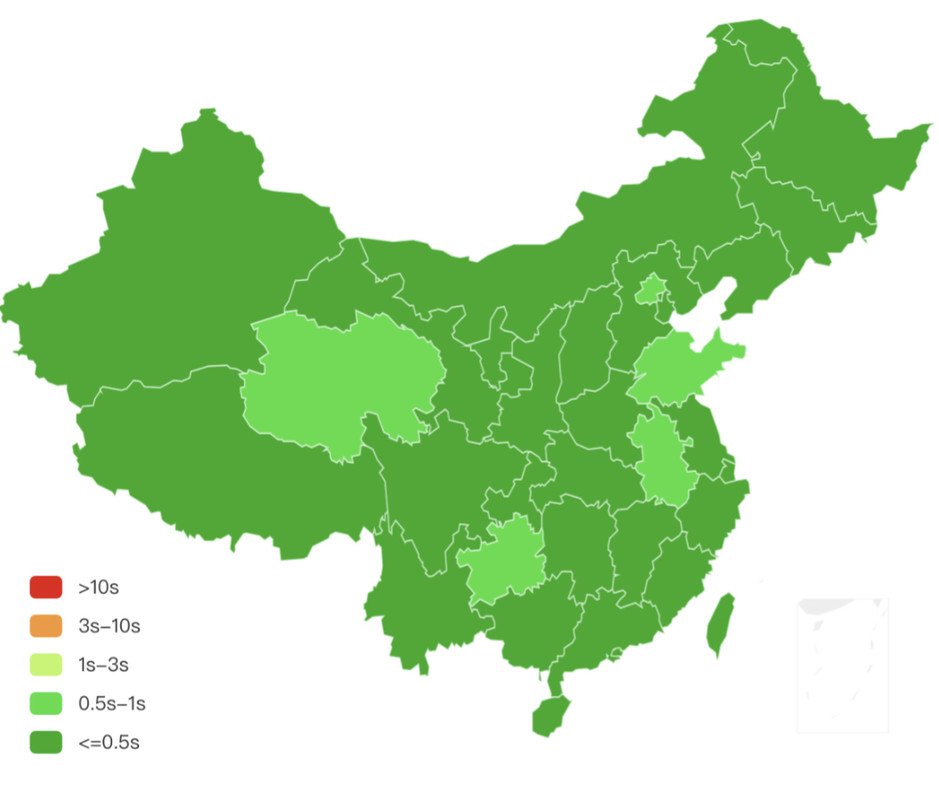
测速网站
程序员入门
https://www.w3cschool.cn/
https://www.runoob.com/
代码源泉
度盘不限速
https://kinhdown.com/
(尽量别登录)
。。。。。。有时间慢慢更(偷懒)
建站记
这篇文章简单记录一下本博客的建站过程。
目录
- Fork一个jekyll模板仓库(感谢@Huxpro)
- 更改仓库名,打开Github Pages
- 修改配置文件
- 写博文
一.Fork仓库
注:这一步可以自己安装jekyll,但是我一直失败……所以这里我选择了fork现成的。
选择一个模板仓库(我选了黄玄大神的),点击fork。
二.更改仓库名并打开Github Pages
进入仓库,点settings,将仓库名改为“username.github.io”(username为你的github用户名)
翻到pages,选择branch:main,/root,save。

三.修改配置文件
打开_config.yml,修改个人信息(具体过程略)
四.写博文
博文文件名格式:yyyy-mm-dd-name.md(name为博客标题);文章路径:_posts文件夹下
删除原仓库的文章,新建一篇文章(文件名格式如上),在里面用markdown写下你想写的内容吧!
博客到这里已经建好了,接下来要做的:个性化,统计,评论系统,等等,以后再说。
小米4a路由器刷入openwrt
一、参考资料
二.刷入
1.刷入breed
#小米4a不能用breed刷入官版openwrt!
1.使用工具openwrtinvasion开官方固件的ssh,putty接入
文件+教程链接:https://github.com/acecilia/OpenWRTInvasion
2.上传固件
可以用各种方式上传!
3.刷入breed(可略过)
mtd -r write /tmp/breed-mt7621-pbr-m1.bin Bootloader
4.刷入openwrt
(1)官版
https://downloads.openwrt.org/releases/23.05.0-rc1/targets/ramips/mt7621/
cd /tmp
mtd -e OS1 -r write xiaomi_mi-router-4a-gigabit-squashfs-sysupgrade.bin OS1
(2)可以编译定制固件
提供一个教程:https://www.bilibili.com/read/cv21136299
提供一个编译好的固件:https://www.right.com.cn/forum/forum.php?mod=viewthread&tid=4054821&ordertype=1&simpletype=no
可以必须用breed刷入.
拔掉电源线.按往reset不放,插电开机进入breed。网线连接电脑网口与路由lan口.
电脑访问192.168.1.1
先备份eeprom.mac地址再刷入(略)
3.开机
待led指示灯由黄灯闪烁变为蓝灯常亮后则开机成功.
总体体验上,openwrt的开源驱动跑在硬路由上确实效果欠佳.有很高延迟.
#刷入pandorabox延迟有所好转.
以上.
Hello World
Welcome to Hexo! This is your very first post. Check documentation for more info. If you get any problems when using Hexo, you can find the answer in troubleshooting or you can ask me on GitHub.
Quick Start
Create a new post
1 | $ hexo new "My New Post" |
More info: Writing
Run server
1 | $ hexo server |
More info: Server
Generate static files
1 | $ hexo generate |
More info: Generating
Deploy to remote sites
1 | $ hexo deploy |
More info: Deployment
建站记-2
(全文共526字,预计阅读时间1-2分钟)
新年快乐!
因为各种原因,本博客已经很久没有维护,发现已经无法访问,加上原本使用的valine评论系统存在xss漏洞,且原先使用的主题已经久未更新,决定放弃修复,直接换用Hexo+NexT主题,评论系统换用livere来必力,简单记录。
快速,简洁且高效的博客框架
——摘自Hexo官网
1,安装node.js环境
访问node.js官网,”https://nodejs.org/en",下载LTS长期支持版,安装.
检查:node -v npm -v
2,npm换源
npm config set registry https://registry.npmmirror.com
3,安装hexo
npm install -g hexo-cli
检查:hexo -v
4,hexo初始化
hexo init blog_name
cd blog_name
npm install
5,查看效果
hexo g
hexo s //打开本地服务
浏览器打开http://localhost:4000看效果
命令行中Ctrl+C关闭本地服务
6,配置git
github新建repo,名称github_username.github.io(github_username换成自己的github用户名)
安装git
git config --global user.name "xxxxxx"
git config --global user.email "[email protected]"
ssh-keygen -t rsa -C "your_email"
在”C:\Users\username\ .ssh”目录找到id_rsa.pub文件
在Github的设置中,找到SSH and GPG keys,新建SSH Key,记事本打开id_rsa.pub文件,将内容复制到Key,标题随便起,添加Key。
7,部署
打开_config.yml,底部deploy改成
deploy:
  type: git
  repository: [email protected]:github_username/github_username.github.io.git
  branch: main
运行npm install hexo-deployer-git --save
部署代码:
hexo clean
hexo generate
hexo deploy
8,cloudflare配置(自定义域名+cdn加速,可省略)
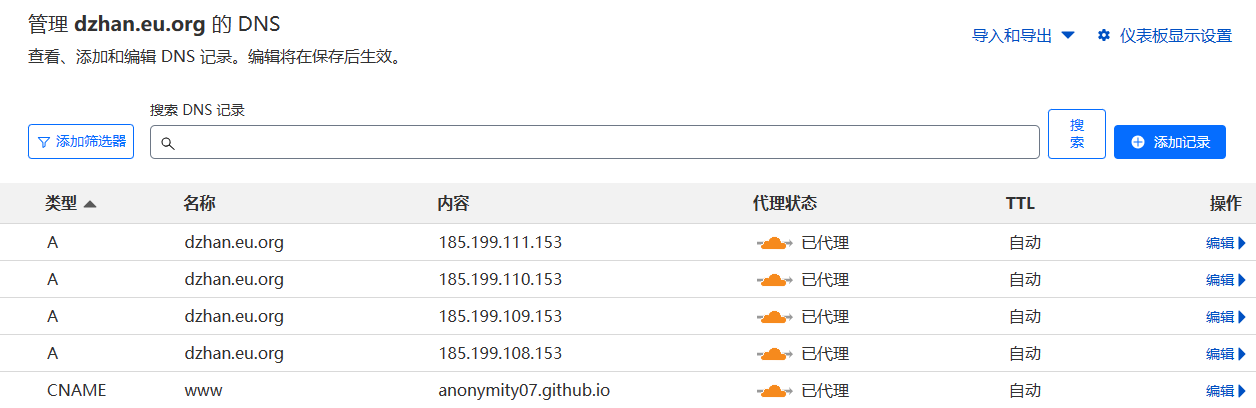
添加如上几条dns记录,暂时都关掉代理,设成仅dns;ssl/tls设成完全(严格)
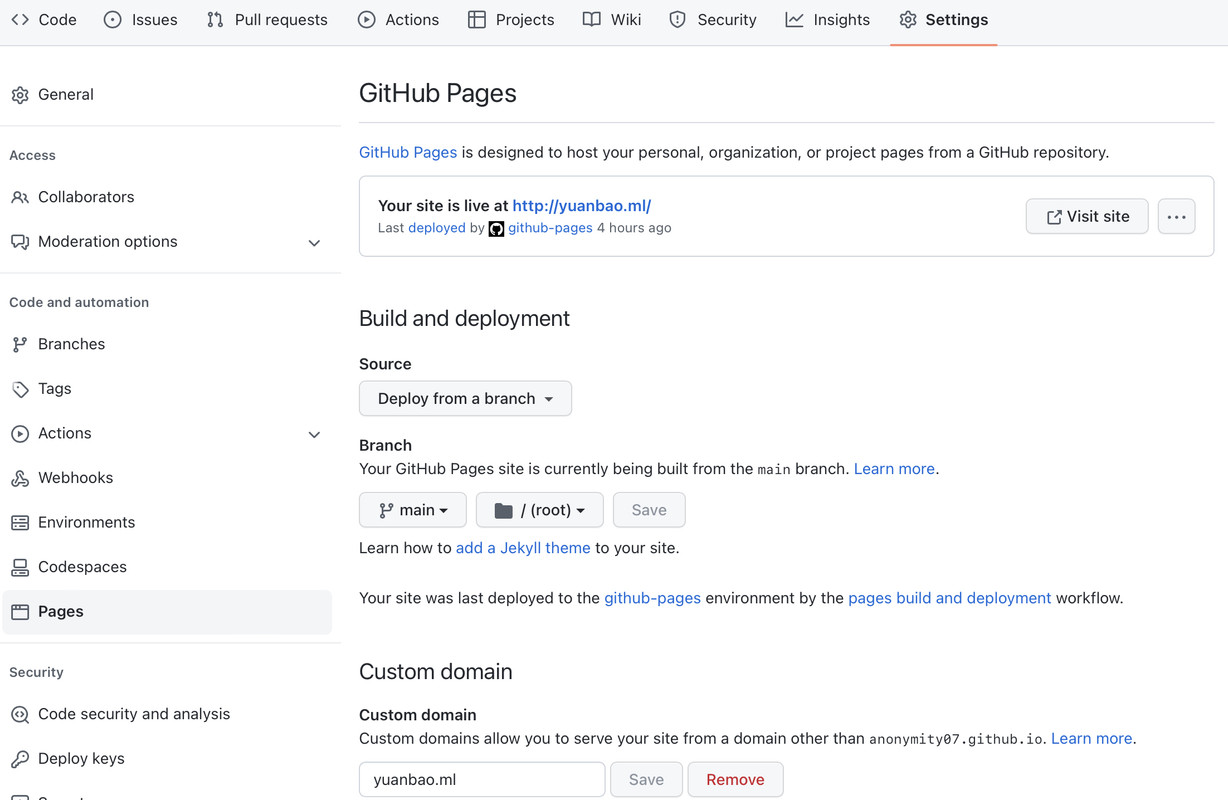
9,github pages 配置
来到GitHub repo settings中的pages页面,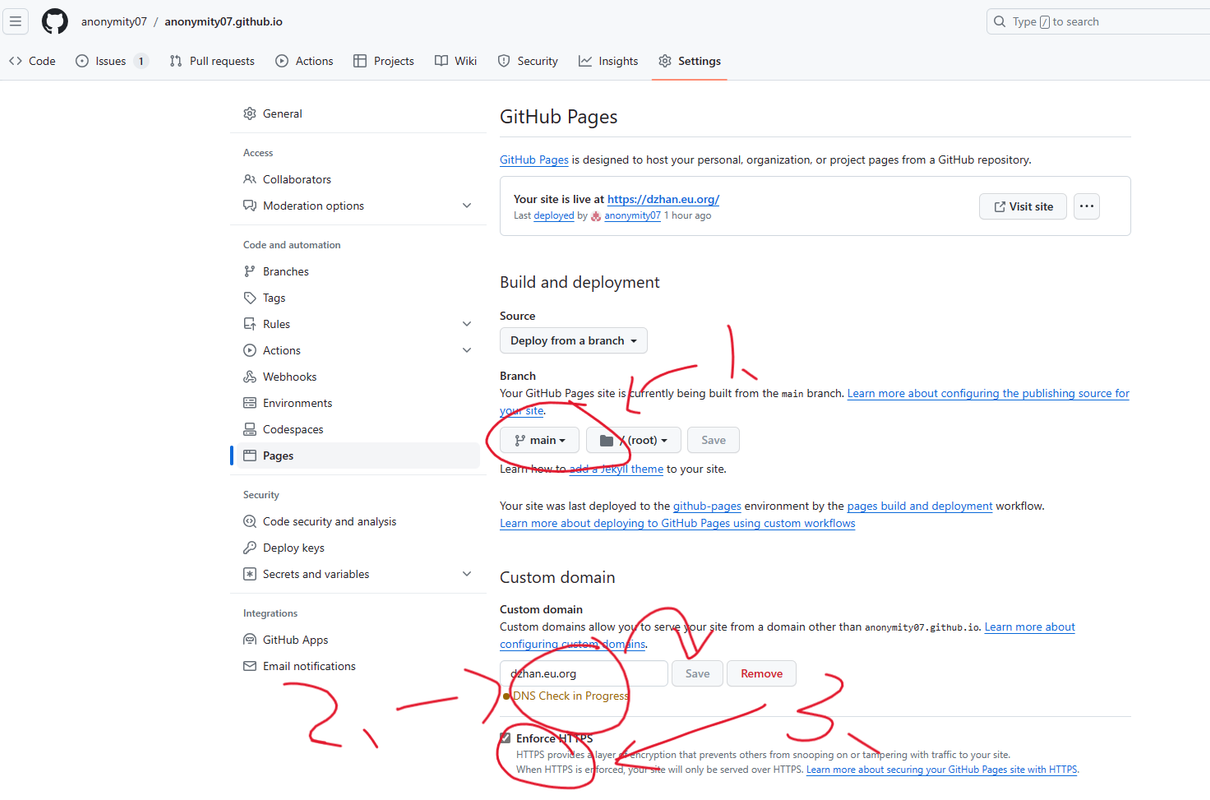
如图,三步。
回到cloudflare,打开代理。
10,NexT主题
cd hexo-site
git clone https://github.com/next-theme/hexo-theme-next themes/next
打开站点_config.yml,
翻到最后,修改为:theme: next
11,NexT配置/美化
个人喜好,自行百度